Yağ keçesini yanlış takmak erken arızaya, yağ sızıntısına ve maliyetli duruşlara yol açabilir. İster krank mili keçesini değiştirin, ister döner mil keçesini takın, doğru yağ keçesi montajı kritiktir.
In this guide, I’ll show you how to install oil seals the right way—without damaging the lips or misaligning the casing. This article covers tools, step-by-step procedures, lip direction, sealing surface prep, and tips for ensuring long-lasting performance.
What tools are needed for oil seal installation?
Bir atölyeye ihtiyacınız yok; ancak doğru araçları kullanmak her şeyi değiştirebilir.
| Alet | İşlev |
|---|---|
| Yağ Keçesi Montaj Aleti / Pres Aleti | Contayı bozmadan eşit basınç uygular |
| Lastik Tokmak | Kurulum aracı mevcut değilse hafifçe vurarak takın |
| Temizleme Solventi | Mil yüzeyini sızdırmazlık için hazırlar |
| Yağlayıcı (örneğin motor yağı) | Mühürün yerine kaymasına yardımcı olur |
| Düz uçlu tornavida / Pim | Eski mührü dikkatlice çıkarın |
| Mikrometre / Kumpas | Mil ve delik boyutunun uyumlu olduğunu doğrular |
Some kits include their own installer. You can also choose a universal press tool when ordering replacement seals like our TG4 yağ keçesi.
What direction should the oil seal face to prevent leaks?
Installing backward is the most common mistake.
- Ana sızdırmazlık dudağı her zaman sıvı veya yağ tarafına (içeri doğru) bakar
- Toz dudağı (varsa) faces outward, toward contaminants
For skeleton seals like TG4 veya TC yağ keçesi, inspect the lip curvature: the spring side always faces oil.
How to install an oil seal without leaks: full process
-
Eski contayı çıkarın
Use a puller or flat screwdriver. Avoid damaging the housing. -
Clean bore and shaft
Remove oil, dirt, and rust using solvent and lint-free wipes. -
Inspect shaft
Çizik veya oluk olup olmadığına bakın, gerekirse hafifçe cilalayın. -
Lubricate lips
Apply a thin coat of oil or grease—never install dry. -
Yeni contayı hizalayın
Center it squarely over the bore opening. -
Eşit şekilde bastırın veya hafifçe vurun
Use a seal installer or socket. Do not hammer the center. -
Confirm flush seating
Outer edge should be level or slightly recessed—not protruding. -
Double-check orientation
Ensure the spring side faces oil and dust lip faces out.
Working on more complex components? Check our Krank Mili Yağ Keçesi Değiştirme Kılavuzu for deeper instructions.
Can damaged oil seals be reused?
Never reuse old or deformed oil seals—even minor lip damage leads to leaks. Replacement is essential, especially when servicing timing covers or differentials.
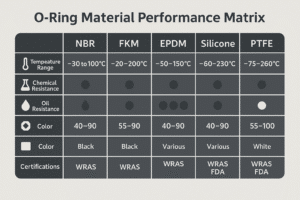
We stock quality replacement seals in NBR and FKM, including OEM types. Explore our TC Ve TG4 seçenekler.
Do you need sealant when installing oil seals?
Usually, HAYIR — but exceptions include:
| Durum | Sealant Required? |
|---|---|
| Pürüzsüz metal delik | ❌ Hayır |
| Worn or oversize housing | ✅ Loctite veya flanş sızdırmazlık maddesi kullanın |
| Static rubber-coated seals (TG4) | ❌ Hayır |
| High-vibration areas | ✅ Light non-hardening sealant on outer edge |
Avoid getting sealant on the lip.
Çözüm
Correct oil seal installation ensures leak-free performance and longer service life. Use the right tools, align lips correctly, and never install dry.
Ready for high-quality oil seal replacements?
We offer durable NBR and FKM shaft seals in all sizes. OEM and custom orders supported.
📧 E-posta: [email protected]
📱 WhatsApp: +86 17622979498
Related topics
TC Skeleton Oil Seal – Metal Shell
TG4 Double-Lip Rotary Oil Seal
Krank Mili Yağ Keçesi Değiştirme Kılavuzu