ഒരു ഓയിൽ സീൽ തെറ്റായി ഇൻസ്റ്റാൾ ചെയ്യുന്നത് അകാല പരാജയം, എണ്ണ ചോർച്ച, ചെലവേറിയ പ്രവർത്തനരഹിതമായ സമയം എന്നിവയ്ക്ക് കാരണമാകും. നിങ്ങൾ ഒരു ക്രാങ്ക്ഷാഫ്റ്റ് സീൽ മാറ്റിസ്ഥാപിക്കുകയാണെങ്കിലും അല്ലെങ്കിൽ ഒരു റോട്ടറി ഷാഫ്റ്റ് സീൽ സ്ഥാപിക്കുകയാണെങ്കിലും, ശരിയായത് ഓയിൽ സീൽ ഇൻസ്റ്റാളേഷൻ നിർണായകമാണ്.
In this guide, I’ll show you how to install oil seals the right way—without damaging the lips or misaligning the casing. This article covers tools, step-by-step procedures, lip direction, sealing surface prep, and tips for ensuring long-lasting performance.
What tools are needed for oil seal installation?
നിങ്ങൾക്ക് ഒരു മുഴുവൻ വർക്ക്ഷോപ്പും ആവശ്യമില്ല - പക്ഷേ ശരിയായ ഉപകരണങ്ങൾ ഉപയോഗിക്കുന്നത് എല്ലാ മാറ്റങ്ങളും വരുത്തുന്നു.
| ഉപകരണം | ഫംഗ്ഷൻ |
|---|---|
| ഓയിൽ സീൽ ഇൻസ്റ്റാളർ / പ്രസ്സ് ടൂൾ | സീലിന് കേടുപാടുകൾ വരുത്താതെ തുല്യ സമ്മർദ്ദം ചെലുത്തുന്നു |
| റബ്ബർ മാലറ്റ് | ഇൻസ്റ്റാളർ ഉപകരണം ലഭ്യമല്ലെങ്കിൽ മൃദുവായി ടാപ്പ്-ഇൻ ചെയ്യുക. |
| ക്ലീനിംഗ് ലായക | സീലിംഗിനായി ഷാഫ്റ്റ് ഉപരിതലം തയ്യാറാക്കുന്നു |
| ലൂബ്രിക്കന്റ് (ഉദാ: എഞ്ചിൻ ഓയിൽ) | സീൽ അതിന്റെ സ്ഥാനത്ത് ഉറപ്പിക്കാൻ സഹായിക്കുന്നു |
| ഫ്ലാറ്റ്ഹെഡ് സ്ക്രൂഡ്രൈവർ / പിക്ക് | പഴയ മുദ്ര ശ്രദ്ധാപൂർവ്വം നീക്കംചെയ്യുന്നു |
| മൈക്രോമീറ്റർ / കാലിപ്പർ | ഷാഫ്റ്റിന്റെയും ബോറിന്റെയും വലുപ്പ പൊരുത്തം പരിശോധിക്കുന്നു. |
Some kits include their own installer. You can also choose a universal press tool when ordering replacement seals like our TG4 ഓയിൽ സീൽ.
What direction should the oil seal face to prevent leaks?
Installing backward is the most common mistake.
- മെയിൻ സീലിംഗ് ലിപ് എല്ലായ്പ്പോഴും ദ്രാവകത്തിന്റെയോ എണ്ണയുടെയോ വശത്തേക്ക് (ഉള്ളിലേക്ക്) അഭിമുഖീകരിക്കുന്നു
- ഡസ്റ്റ് ലിപ് (എന്തെങ്കിലും ഉണ്ടെങ്കിൽ) faces outward, toward contaminants
For skeleton seals like ടിജി4 അല്ലെങ്കിൽ ടിസി ഓയിൽ സീൽ, inspect the lip curvature: the spring side always faces oil.
How to install an oil seal without leaks: full process
-
പഴയ മുദ്ര നീക്കം ചെയ്യുക
Use a puller or flat screwdriver. Avoid damaging the housing. -
Clean bore and shaft
Remove oil, dirt, and rust using solvent and lint-free wipes. -
Inspect shaft
പോറലുകളോ ചാലുകളോ ഉണ്ടോ എന്ന് നോക്കുക - ആവശ്യമെങ്കിൽ ചെറുതായി പോളിഷ് ചെയ്യുക. -
Lubricate lips
Apply a thin coat of oil or grease—never install dry. -
പുതിയ സീൽ വിന്യസിക്കുക
Center it squarely over the bore opening. -
തുല്യമായി അമർത്തുക അല്ലെങ്കിൽ ടാപ്പ് ചെയ്യുക
Use a seal installer or socket. Do not hammer the center. -
Confirm flush seating
Outer edge should be level or slightly recessed—not protruding. -
Double-check orientation
Ensure the spring side faces oil and dust lip faces out.
Working on more complex components? Check our ക്രാങ്ക്ഷാഫ്റ്റ് ഓയിൽ സീൽ മാറ്റിസ്ഥാപിക്കൽ ഗൈഡ് for deeper instructions.
Can damaged oil seals be reused?
Never reuse old or deformed oil seals—even minor lip damage leads to leaks. Replacement is essential, especially when servicing timing covers or differentials.
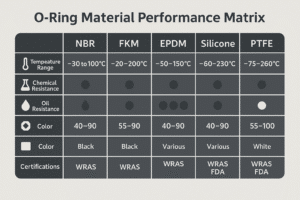
We stock quality replacement seals in NBR and FKM, including OEM types. Explore our ടി.സി. ഒപ്പം ടിജി4 ഓപ്ഷനുകൾ.
Do you need sealant when installing oil seals?
Usually, ഇല്ല — but exceptions include:
| അവസ്ഥ | Sealant Required? |
|---|---|
| മിനുസമാർന്ന മെറ്റൽ ബോർ | ❌ ഇല്ല |
| Worn or oversize housing | ✅ ലോക്റ്റൈറ്റ് അല്ലെങ്കിൽ ഫ്ലേഞ്ച് സീലന്റ് ഉപയോഗിക്കുക |
| Static rubber-coated seals (TG4) | ❌ ഇല്ല |
| High-vibration areas | ✅ Light non-hardening sealant on outer edge |
Avoid getting sealant on the lip.
തീരുമാനം
Correct oil seal installation ensures leak-free performance and longer service life. Use the right tools, align lips correctly, and never install dry.
Ready for high-quality oil seal replacements?
We offer durable NBR and FKM shaft seals in all sizes. OEM and custom orders supported.
📧 ഇമെയിൽ: [email protected]
📱 വാട്ട്സ്ആപ്പ്: +86 17622979498
Related topics
TC Skeleton Oil Seal – Metal Shell
TG4 Double-Lip Rotary Oil Seal
ക്രാങ്ക്ഷാഫ്റ്റ് ഓയിൽ സീൽ മാറ്റിസ്ഥാപിക്കൽ ഗൈഡ്