오일 씰을 잘못 설치하면 조기 고장, 오일 누출 및 비용이 많이 드는 가동 중단으로 이어질 수 있습니다. 크랭크 샤프트 씰을 교체하든 회전 샤프트 씰을 장착하든 적절한 오일 씰 설치 중요합니다.
In this guide, I’ll show you how to install oil seals the right way—without damaging the lips or misaligning the casing. This article covers tools, step-by-step procedures, lip direction, sealing surface prep, and tips for ensuring long-lasting performance.
What tools are needed for oil seal installation?
작업장 전체가 필요한 것은 아니지만, 적절한 도구를 사용하면 큰 차이가 납니다.
| 도구 | 기능 |
|---|---|
| 오일 씰 설치기 / 프레스 도구 | 씰을 손상시키지 않고 균일한 압력을 가합니다. |
| 고무망치 | 설치 도구를 사용할 수 없는 경우 부드럽게 두드려주세요. |
| 세척용 용매 | 밀봉을 위해 샤프트 표면을 준비합니다. |
| 윤활제(예: 엔진 오일) | 씰이 제자리에 들어가도록 도와줍니다. |
| 플랫헤드 스크루드라이버 / 피크 | 오래된 씰을 조심스럽게 제거합니다 |
| 마이크로미터 / 캘리퍼 | 샤프트와 보어 크기가 일치하는지 확인합니다. |
Some kits include their own installer. You can also choose a universal press tool when ordering replacement seals like our TG4 오일 씰.
What direction should the oil seal face to prevent leaks?
Installing backward is the most common mistake.
- 메인 실링 립 항상 유체 또는 오일 쪽(안쪽)을 향함
- 더스트립(있는 경우) faces outward, toward contaminants
For skeleton seals like TG4 또는 TC 오일 씰, inspect the lip curvature: the spring side always faces oil.
How to install an oil seal without leaks: full process
-
오래된 씰을 제거하세요
Use a puller or flat screwdriver. Avoid damaging the housing. -
Clean bore and shaft
Remove oil, dirt, and rust using solvent and lint-free wipes. -
Inspect shaft
긁힌 자국이나 홈이 있는지 살펴보고, 필요하다면 가볍게 닦으십시오. -
Lubricate lips
Apply a thin coat of oil or grease—never install dry. -
새로운 씰을 정렬합니다
Center it squarely over the bore opening. -
균등하게 누르거나 두드리세요
Use a seal installer or socket. Do not hammer the center. -
Confirm flush seating
Outer edge should be level or slightly recessed—not protruding. -
Double-check orientation
Ensure the spring side faces oil and dust lip faces out.
Working on more complex components? Check our 크랭크샤프트 오일 씰 교체 가이드 for deeper instructions.
Can damaged oil seals be reused?
Never reuse old or deformed oil seals—even minor lip damage leads to leaks. Replacement is essential, especially when servicing timing covers or differentials.
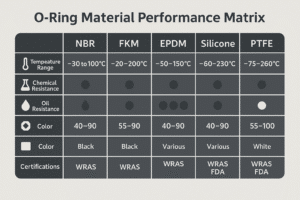
We stock quality replacement seals in NBR and FKM, including OEM types. Explore our 티씨티 그리고 TG4 옵션.
Do you need sealant when installing oil seals?
Usually, 아니요 — but exceptions include:
| 상태 | Sealant Required? |
|---|---|
| 매끄러운 금속 보어 | ❌ 아니요 |
| Worn or oversize housing | ✅ 로타이트나 플랜지 실런트를 사용하세요 |
| Static rubber-coated seals (TG4) | ❌ 아니요 |
| High-vibration areas | ✅ Light non-hardening sealant on outer edge |
Avoid getting sealant on the lip.
결론
Correct oil seal installation ensures leak-free performance and longer service life. Use the right tools, align lips correctly, and never install dry.
Ready for high-quality oil seal replacements?
We offer durable NBR and FKM shaft seals in all sizes. OEM and custom orders supported.
📧 이메일: [email protected]
📱 왓츠앱: +86 17622979498
Related topics
TC Skeleton Oil Seal – Metal Shell
TG4 Double-Lip Rotary Oil Seal
크랭크샤프트 오일 씰 교체 가이드